

Sending pictures or other large files can be a hassle. If you’ve ever tried to text or email more than a few photos at once, you’ve probably experienced issues with the pictures taking forever to send or failing to send altogether. Thankfully, AirDrop makes it easy to send larger files.
What is AirDrop?
AirDrop is a feature on Apple devices that makes it easy to send and receive files. This tool can send both large and small files much faster than through messaging or email.
With AirDrop, you can efficiently send photos, videos, documents, contacts, voice memos, map locations – really almost any file from a phone, tablet, or laptop that can be shared.
How Does AirDrop Work?
AirDrop uses Bluetooth technology to discover another device nearby, and uses that Bluetooth connection along with Wi-Fi to transfer data from one device to another. The Bluetooth connection creates a peer-to-peer Wi-Fi network between the two devices, and files are actually sent encrypted, making it safer than email or text messaging.
AirDrop Settings
AirDrop is not available on all devices. As an Apple product feature, it is only available on newer Apple products. AirDrop is available on iPhones (iPhone 5 and up) running on at least iOS7 or higher, and iPads fourth generation and up. AirDrop also works on Macs made after 2012, running on OS X 10.10 Yosemite or later.
How To Turn on AirDrop on iPhone
To turn on AirDrop on an iPhone or iPad, you need your settings in order first.
- Bluetooth must be turned on.
- Wi-Fi must be turned on.
- Personal Hotspot should be turned off.
- The person you’re AirDropping to or receiving from must be close by.
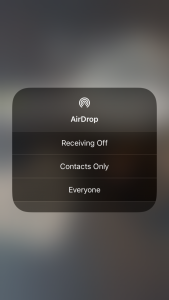
- AirDrop must be turned on to “Everyone” or “Contacts Only”.
To turn on AirDrop, and to check that Bluetooth, Wi-Fi, and Personal Hotspot settings are as they should be, follow these steps:
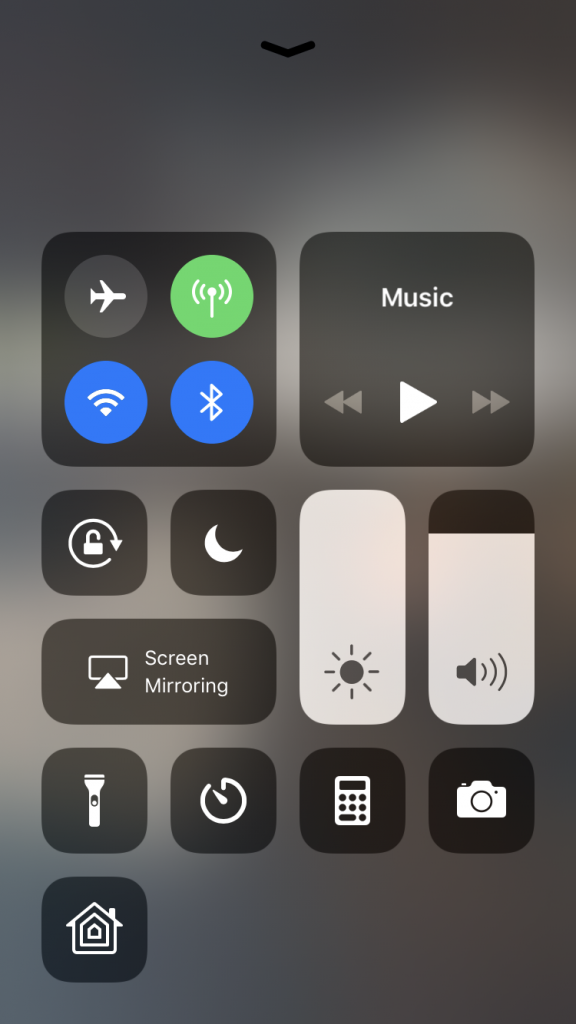
- Swipe up from the bottom of your screen to open the Control Center.
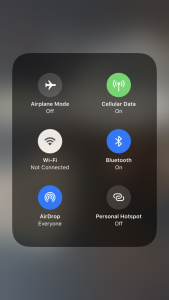
- Press and hold the top left control box (pictured below) so that it opens to a larger menu of icons.
- Tap Bluetooth and Wi-Fi on and Personal Hotspot off.
- Tap AirDrop and choose either “Contacts Only” or “Everyone”.
You can also adjust this in your settings. Follow these instructions to turn AirDrop on in Settings instead:
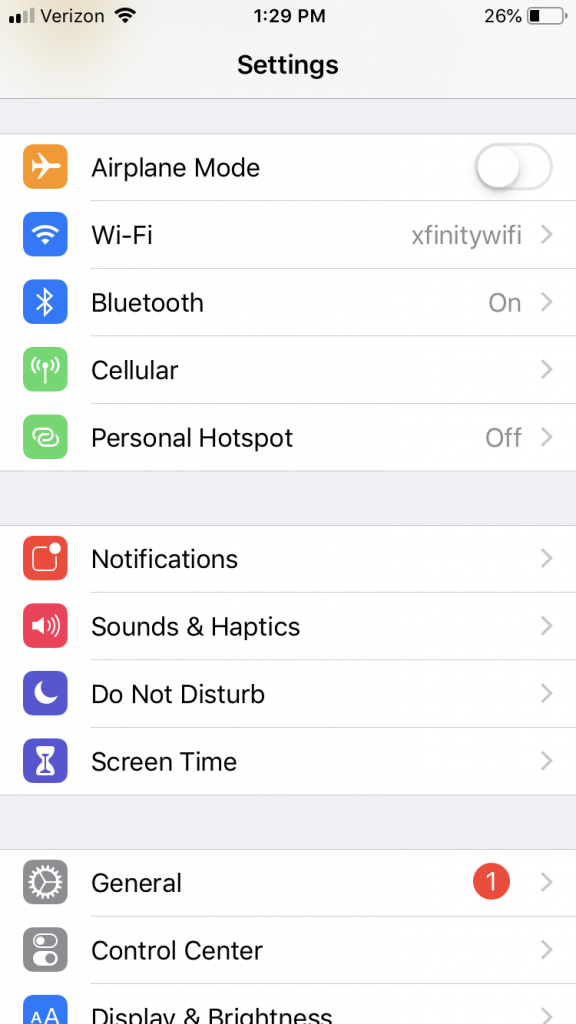
- Open the Settings app on your phone.
- In the top section of the menu, make sure Wi-Fi and Bluetooth are on and Personal Hotspot is off.
- Scroll down and tap “General”
- Tap “AirDrop”.
- Choose “Contacts Only” or “Everyone”.
Depending on your preferences, you can allow only contacts to AirDrop to you, or everyone, meaning anyone in range who can also AirDrop. Some people have trouble using the “Contacts Only” option even if the other person is in their contacts, as the connection sometimes fails.
Allowing everyone to AirDrop to you is mostly harmless, although someone could prank AirDrop you something funny or strange. You can always cancel, or not accept, an AirDrop if you receive one from an unknown source.
How To Turn on AirDrop on Mac
You can also AirDrop images and files from a Mac laptop, provided you have a current enough model. To turn AirDrop on (or off) on your Mac, follow these steps:
- Open Finder.
- Click AirDrop on the left-side menu.
- Click the blue text “Allow me to be discovered by” to change from “No One”, “Contacts Only”, or “Everyone”.
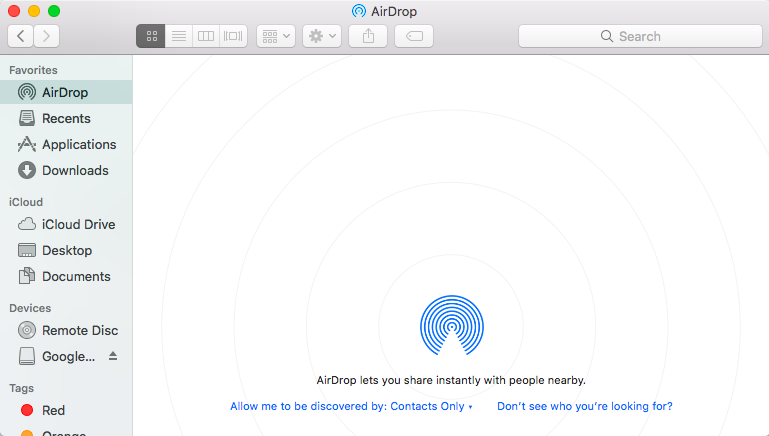
Once your settings are saved, your Mac can send or receive AirDropped files.
How To AirDrop Photos from an iPhone
To AirDrop from an iPhone or iPad, follow these simple instructions.
- Open the image or file that you want to send (our example is a picture).
- Press the share icon (box with an arrow going up).
- Available devices for AirDrop will appear above the other sharing options.
- Tap the name of the device you want to share with.
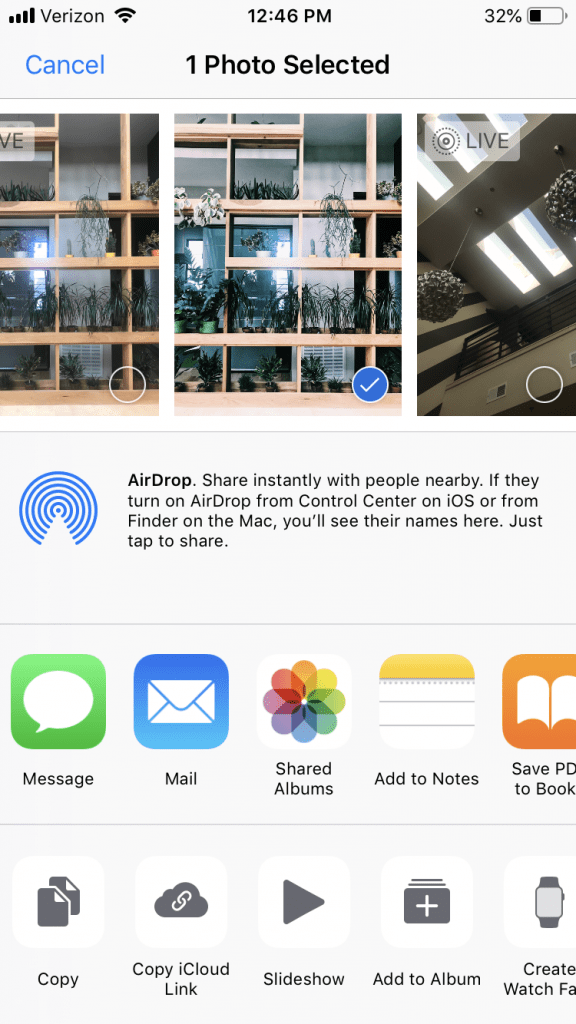

The person you’re sharing with will have to accept the AirDrop request to save the images. If no one appears, you can troubleshoot by both turning AirDrop on and off again, and by checking that your settings are adjusted correctly.
How To AirDrop from a Mac
On a Mac desktop or laptop, you can AirDrop by dragging and dropping or through a typical share menu.
To AirDrop on a Mac through the drag and drop method, follow these instructions:
- Open Finder.
- Find the files you want to share, and drag them in Finder over the AirDrop tab on the left side panel.
- Hold the files over the AirDrop tab until Finder opens the AirDrop window.
- Drop the files on the name of the device you want to share with.
You can also AirDrop from your Mac by using the standard pop-up menu for sharing. Follow these steps to AirDrop on a Mac this way:
- Find the file you want to share.
- Right click on the file, or click “File” on the top menu bar, and choose “Share” from the menu that pops up.
- Click “AirDrop”.
- Click on the contact or device you want to share with.
Troubleshooting AirDrop
If you’re having trouble getting AirDrop to work, try a few of our troubleshooting tips.
Make sure your settings are correct. Wi-Fi and Bluetooth must be on, Personal Hotspot should be off. AirDrop, of course, must be on. You also must be in close range to the device you want to share to.
Change from “Contacts Only” to “Everyone”. Sometimes devices don’t fully recognize contacts and fails to make the connection. Switch to everyone, even temporarily, just to get AirDrop to work.
Turn AirDrop on and off again. The classic fix – simply try turning it on and off again. Sometimes it takes a second try to make the connection.


Add comment